
Checklist for End-of-Hire Photo Documentation
Step-by-step checklist for capturing, organizing, and storing timestamped end-of-hire photos to prevent rental disputes.
When it comes to rental returns, disputes over damage can cost time, money, and customer trust. A simple solution? End-of-hire photo documentation. This process creates a clear, timestamped record of a rental's condition, protecting both businesses and customers. Here's what you need to know:
- Why It Matters: Photos prevent disputes by documenting the rental's condition, mileage, fuel levels, and any visible damage.
- Preparation Tips: Clean the rental, ensure proper lighting, and use tools like rulers or coins for scale.
- What to Photograph: Exterior, interior, wheels, undercarriage, license plate, VIN, and any accessories.
- Best Practices: Use standard camera settings, avoid filters, and organize photos by rental ID for quick access.
- Storage: Use cloud storage with backups and keep metadata intact for authenticity.
Automation tools like Lockii simplify this process, ensuring consistent documentation, even for after-hours returns. By following a rental business automation checklist, you can streamline operations, reduce disputes, and maintain clear records.
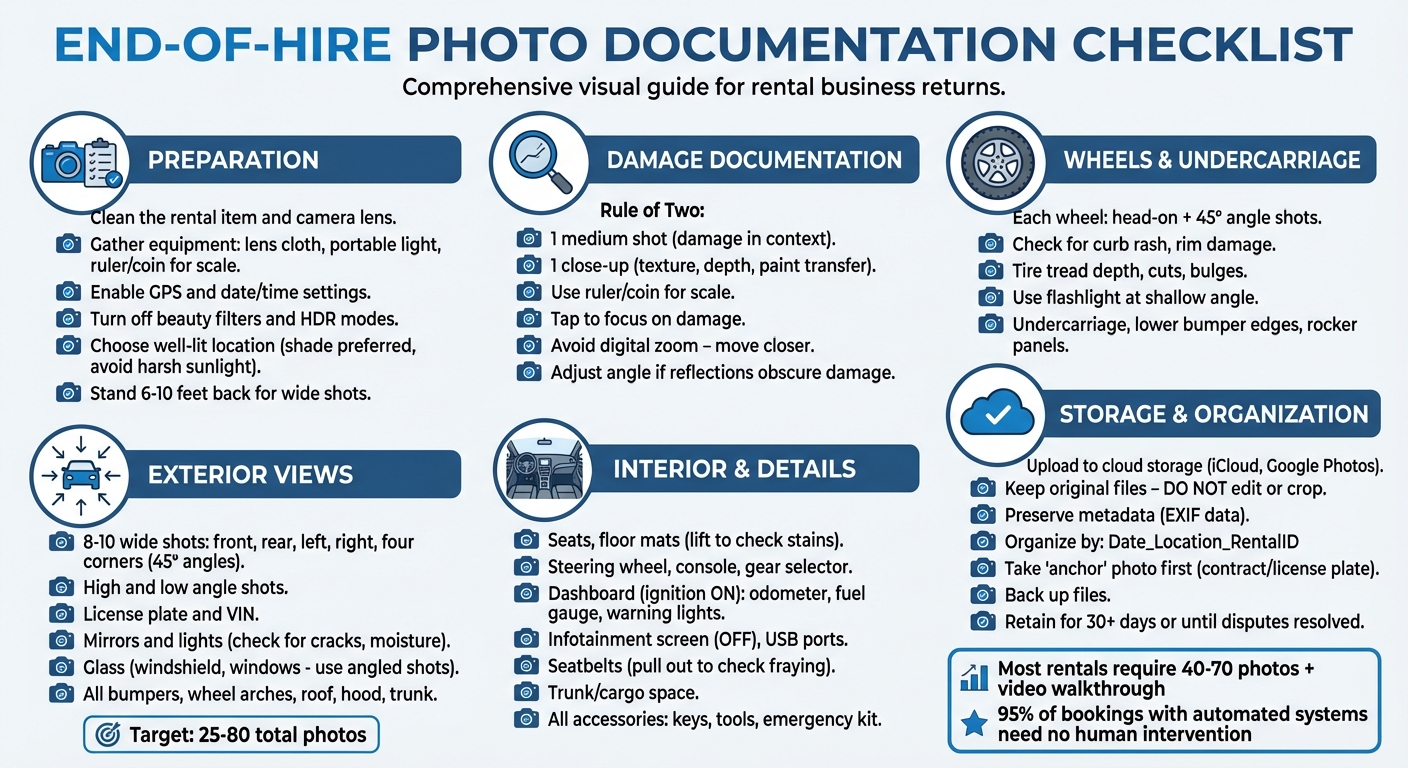
End-of-Hire Photo Documentation Checklist for Rental Returns
Preparing to Take Photos
Taking a few moments to prepare before snapping photos can make a big difference in capturing clear, detailed documentation. Clean the rental item and your equipment, ensure proper lighting, and pick a location that allows every detail to stand out. Here’s how to get everything ready for the best results.
Clean the Rental Item First
A clean surface ensures that every detail is visible. Start by wiping your camera lens - a smudged lens can blur scratches and obscure fine details. Dirt, mud, or water droplets on the rental item itself can also hide damage like scratches, paint chips, or "curb rash." A quick wipe can uncover these marks without altering the item's condition. If cleaning isn’t possible on-site, photograph the dirt to provide context. For example, heavy grime might conceal pre-existing damage, so you may need to capture close-ups and carefully clean small areas to reveal the actual condition. Be mindful of weather conditions, too - rain or fog can leave droplets that obscure fine scratches. If the item is wet, dry small sections before taking close-up shots.
Gather Your Equipment
Whether you’re using a smartphone or a camera, preparation is key. Most self-service rental businesses take between 40 and 70 photos, plus a short video walkthrough, for thorough documentation. Always have a lens cloth or tissue on hand to keep your camera lens clean. If you’re in a dark area, like a parking garage or dealing with evening returns, bring a portable light or use your phone’s flash for better visibility in close-ups. To show the scale of damage, place a ruler, coin, or small object next to any scratches or dents in your close-up shots. This simple step makes the size of the damage clear and helps avoid disputes.
Also, enable location tagging (GPS) and automatic date/time settings on your camera for metadata that reinforces the reliability of your documentation. Turn off beauty filters, heavy HDR, or any "optimize" modes that might smooth out textures and hide scratches or dents. Stick to "normal" photo mode (1x zoom) to avoid distortions that wide-angle or telephoto lenses can create.
Choose the Right Location
The quality of your photos depends heavily on lighting and surroundings. Harsh midday sunlight can wash out scuffs, while dimly lit garages or evening conditions can make scratches and dents nearly invisible. Opt for shade or position the sun behind you to minimize glare. If the area is too dark, relocate the item to a well-lit spot. This is especially important for unstaffed rental operations where clear photos are the primary record of condition. Reflections from nearby objects or bright lights can make surfaces appear flawless, masking actual damage. If you notice this, adjust your angle - move a step to the left or right and retake the photo. In bright sunlight, you can use your body to cast a soft shadow over reflective surfaces, revealing hidden dents or swirls.
Finally, choose a safe, quiet location away from moving traffic. This allows you to perform a thorough walkaround without distractions or safety concerns. Make sure there’s enough space to stand 6 to 10 feet back for wide shots that capture the item in its surroundings, including any bay markings or nearby context.
sbb-itb-eb44693
Key Photo Angles and Areas to Capture
Once you're ready, it's time to focus on capturing the right angles and details. Consistency and thoroughness are key to creating a reliable visual record for rental documentation. Aim for a comprehensive set of 25–80 photos to cover all relevant details and potential damage.
Exterior Views
Start with 8–10 wide shots showing all sides of the vehicle (front, rear, left, right, and the four corners at 45° angles). These shots should highlight areas like the bumpers, wheel arches, roof, hood, trunk, and undercarriage. Use high and low angles to document both obvious and subtle damage. For low-angle shots, crouch down to capture scrapes on bumpers or side sills.
Focus on specific exterior components, such as:
- Mirrors and Lights: Photograph the mirrors and lights, ensuring details like the housing, glass, and edges are visible. Look for cracks or signs of moisture.
- Glass: Take wide shots of the windshield and rear window, and use angled shots to reveal chips or cracks that reflect light.
Don’t forget to include the license plate and VIN (visible on the dashboard or door jamb) to tie the photo set to the specific vehicle. Start by photographing the rental contract or key packet alongside the license plate to establish clear identification.
"The goal is not to create an art project, it is to create evidence that is legible, complete, and clearly taken before departure." – Hola Car Rentals
Zoom in on any visible damage for detailed documentation.
Close-Up Shots of Damage
When damage is identified, follow the "Rule of Two." Take one medium shot to show the damage in context (including nearby features like a wheel center cap or panel edge) and one close-up to capture details like texture, depth, or paint transfer. Use your smartphone's focus feature by tapping on the damage, and take multiple shots to ensure at least one is sharp. Avoid digital zoom by physically moving closer to the area. If reflections or bright sunlight obscure scratches, adjust your angle or use your shadow to highlight the damage.
"A close-up without context invites arguments about which wheel it is. Always take at least one shot where spokes, center cap, and damaged lip appear together." – Hola Car Rentals
Interior and Storage Areas
Thoroughly document the interior by photographing seat surfaces, floor mats (lift them slightly to check for hidden stains), the steering wheel, center console, gear selector, climate controls, cup holders, and trunk or cargo space. Don’t skip details like infotainment screens (capture them turned off), USB ports, charging cables, seatbelts (slightly pulled out to check for fraying), headliner, sun visors, door cards, entry thresholds, and the instrument cluster showing the odometer, fuel gauge, and warning lights.
Wheels, Tires, and Undercarriage
Wheels and tires are common sources of disputes during rental returns. Photograph each wheel head-on and at a 45° angle to capture rim damage or curb rash. Inspect tire tread depth and look for cuts, bulges, or uneven wear. Use a flashlight or your phone’s light at a shallow angle to reveal subtle dents or scratches on the rims. Crouch down to photograph the undercarriage, lower bumper edges, and rocker panels - these areas are often overlooked but frequently damaged.
Accessories and Attachments
Be sure to document all provided equipment, such as key fobs, toll transponders, child seat anchors, emergency kits, locks, or tools. For trailers or equipment rentals, include any accessories like tie-down straps, jacks, or safety chains. Photograph both their condition and presence to avoid disputes later.
Lighting and Camera Best Practices
Good lighting can mean the difference between clear, reliable photos and ones that spark disputes. Direct sunlight might seem ideal, but it often washes out paint details and hides minor scuffs or scratches. A better approach is to use shade or position your body to create a shadow line, which helps reveal dents and surface imperfections that vanish in bright light. In dim conditions, a flash can expose curb rash on wheels or scratches on bumpers. Adjusting your angle to catch reflections is another trick - it highlights chips, cracks, and flaws in glass or paint. These simple lighting techniques, paired with proper camera settings, ensure your photos capture every detail.
Start by making sure your camera lens is clean - smudges can blur fine details. Stick to standard photo mode and avoid portrait or beauty filters, as they can soften the sharpness you need for documentation. Use 1x zoom and physically move closer for detailed shots. If the rental item is wet, water droplets can obscure damage, so take extra angles and wipe a small area around the damage to get a clear view.
For wide exterior shots, stand about 6 to 10 feet away to frame the entire item consistently. Keep the camera level and parallel to the side panels or surfaces to clearly capture dents and alignment issues. Don’t forget to document the dashboard with the ignition on - this will show fuel levels, odometer readings, and any active warning lights.
"The goal is not artistic photography, it is to create a simple, complete set that matches how damage is logged on typical rental condition reports." – Hola Car Rentals
Before wrapping up, check your photos for clarity. Retake any blurry ones right away to avoid missing crucial details during the inspection.
How to Store and Organize Photos
Once you've taken clear, detailed images, it's crucial to store and organize them properly to ensure they remain secure and easily accessible.
Use Cloud-Based Storage
Start by transferring your photos to a reliable cloud storage service like iCloud or Google Photos. These platforms offer automatic syncing, which helps keep your documentation safe and accessible .
It's important to keep the original files untouched. Avoid editing, cropping, or applying filters, as these actions can alter the metadata (EXIF data). This metadata includes timestamps, GPS coordinates, and camera settings, all of which are essential for verifying the authenticity of your photos in legal or insurance-related matters .
Organize Photos by Date and Rental ID
A disorganized collection of photos can slow down dispute resolutions, especially when solving labour shortages in rental businesses through automation. To make retrieval effortless, create folders or albums for each rental and use a consistent naming system. For example, "2026-03-28_Miami_ID9876" (Date_Location_RentalID) works well for quick identification during audits or disputes.
For added clarity, take an "anchor" photo at the start of each set. This could include a rental contract, key packet, or license plate alongside the item being documented. It visually ties the photo set to a specific transaction. Additionally, name individual files descriptively, such as "Fuel_Level" or "Front_Left_Bumper", to make finding specific images faster.
"A big batch of random images is less useful than a tidy set you can quickly search." – Hola Car Rentals
Once your photos are organized, back them up to ensure this system remains intact.
Back Up and Secure Your Photos
While cloud storage is a great starting point, it shouldn't be your only backup. Always confirm that your uploads have been successfully completed - if an app fails to sync, manually save the files to another location.
Keep photos for at least 30 days after the rental period ends or until any disputes are resolved. For tax purposes or potential legal issues, it’s wise to retain these records for several years. Having multiple backups ensures your documentation is always safe and accessible when needed.
Using Lockii for End-of-Hire Photos
Lockii makes end-of-hire photo documentation simple, efficient, and automated, ensuring a seamless process for both customers and rental businesses.
Simplified Photo Capture with Lockii
Lockii takes the hassle out of returns by using contactless rental models to automate the process. Before customers can complete a return, they must go through a quick end-of-hire quiz and upload photos of the rented item. With clear on-screen instructions, customers capture images from multiple angles, eliminating the need for staff involvement in coordinating or organizing these photos. This creates a detailed visual record without requiring any manual effort from employees.
What’s more, Lockii enables customers to return rentals anytime - day or night - thanks to its integration with IglooHome's digital locks. The mandatory photo upload ensures every return is fully documented, no matter the time or location. For businesses managing multiple sites, this means consistent standards for photo documentation across all locations, without the added expense of staffing each return.
"Since switching to Lockii, things have gotten so much easier. I was juggling three different systems before, and now it's all in one place." - Matt Cole, Founder, Empire Trailer Hire
Automatic Photo Organization and Audit Logs
Lockii doesn’t just collect photos - it organizes them with precision. Each photo is automatically timestamped and stored in item and booking audit logs, making retrieval during disputes quick and straightforward. GPS verification further strengthens the documentation by confirming the exact time and location of each return.
The platform’s tamper-proof audit logs record who uploaded the photos and when, which is especially valuable if disputes escalate to legal matters. Everything is accessible through Lockii's centralized dashboard, often described as a "one pane of glass." This eliminates the need to dig through multiple cloud services or folders, saving time and effort. Additionally, Lockii links return photos directly to maintenance records, helping businesses track damage patterns and repair costs over time, all in one place.
Building Customer Trust and Protection
Lockii’s automation and secure audit logs don’t just simplify operations - they also foster trust. Customers appreciate having visual proof of their proper returns, protecting them from false damage claims. At the same time, rental businesses benefit from objective evidence to resolve disputes over additional fees or damage quickly and fairly.
The results speak for themselves: Lockii holds a 5.0-star rating from both businesses and customers, with 95% of bookings completed without any human intervention. Timestamped photos make it easy to justify additional charges, reducing disputes and boosting customer satisfaction.
"Lockii has been a game changer for our trailer rental business. We now offer automated, contactless rentals. It's streamlined, secure, and what our business needed!" - Mario Clewlow, Owner, Hitch Haul
Conclusion
End-of-hire photo documentation plays a key role in safeguarding your rental business. Timestamped photos provide a reliable record of an item's condition, helping to prevent false damage claims and simplifying dispute resolution with clear, objective evidence. These records are especially useful for addressing common challenges in documentation.
For many rental businesses, maintaining consistent records - particularly across multiple locations or during after-hours returns - can be tricky. Manual processes often require staff involvement, leading to missed details or incomplete documentation. Automation helps solve these issues by streamlining the process and reducing human error.
Lockii transforms end-of-hire documentation into an easy, automated workflow. The platform ensures customers complete a return quiz and upload photos before finalizing their rental, removing the need for on-site staff. Features like GPS verification, automatic timestamping, and centralized audit logs ensure every return is thoroughly documented - whether it happens midday or in the middle of the night. This automation allows you to focus on growing your business instead of managing tedious documentation. With 95% of bookings processed without human involvement, a 5.0-star rating, and users managing an average of 10+ locations, Lockii is changing the game for rental operations.
"It's saved me a heap of time and stress, and I can actually focus on running the business again."
– Matt Cole, Founder, Empire Trailer Hire
Use the checklist to ensure every detail is captured and keep your rental business running smoothly.
FAQs
What’s the minimum number of return photos I should take?
To thoroughly document a vehicle, make sure to take photos that clearly show the fuel level, mileage, and overall condition. Be sure to include close-ups of any visible scratches or dents. Capture images of all four sides, the roof, and the wheels to provide a complete visual record. This approach helps safeguard against potential disputes.
How do I prove return photos are real and unedited?
To make sure return photos are genuine and untouched, focus on capturing clear, timestamped images. Include reference objects to provide scale and take photos from multiple angles to show a complete view. Use consistent lighting, avoid edits or filters, and zoom in on any damage with objects nearby for context. Adding identifiable details like license plates, VINs, or surrounding landmarks strengthens their credibility. For extra assurance, consider using burst mode or recording a walk-around video to document the condition in real time without any modifications.
What should I do if a customer returns after-hours?
If a customer returns a vehicle after business hours, it's crucial to document everything thoroughly with clear, timestamped photos. Take pictures from multiple angles to cover the vehicle's condition, including the fuel gauge, odometer, any visible damage, and the parking location or bay number. Be sure to include shots of all sides of the vehicle, the wheels, the interior, and the dashboard.
Additionally, make a record of the fuel level and mileage. This documentation helps protect you from potential disputes regarding damage, fuel discrepancies, or the exact return time when no staff is present to verify the handover.